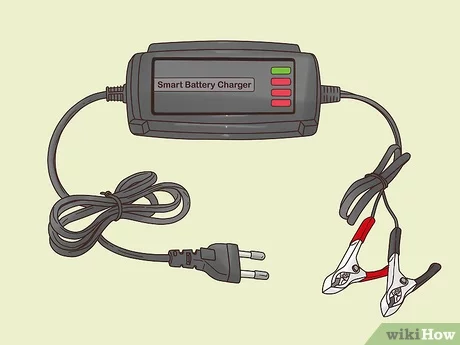
To use a motorcycle battery charger, first connect the red clamp to the positive terminal and then the black clamp to the negative one. Turn on the charger after ensuring all connections are secure and corrosion-free.
A battery charger is a key tool for any rider, designed to keep your motorcycle’s battery in top condition. Utilizing a charger is straightforward, yet some fundamental steps should be followed to ensure safety and extend the battery’s life.
Charging your motorcycle battery can prevent the inconvenience of a bike that won’t start and save you from potentially costly replacements. It’s a simple process that demands attention to detail to avoid damaging the battery or creating a hazardous situation.
By adhering to the manufacturer’s guidance and charging your motorcycle battery regularly, you maintain the health of your battery and ensure your motorcycle is always ready for the road.
Table of Contents
Motorcycle Battery Maintenance
A motorcycle’s heartbeat lies in its battery. Proper maintenance ensures a smooth ride. Without it, you might find yourself stranded. Extended life and peak performance come from diligent care. Embrace regular charging and stay alert for warning signs.
Importance Of Regular Charging
Regular charging is essential for battery health. It extends lifespan. It assures reliability. Motorcycles left idle can suffer from battery discharge. Use a smart charger to maintain charge. This practice avoids power drain and keeps your ride ready.
- Prevents complete discharge
- Ensures starting ease
- Maintains battery lifespan
Signs Of A Failing Battery
Several tell-tale signs hint at a failing battery. Be vigilant.
Dim lights signal low power. Slow cranking engines are warning bells. The battery struggles mightily. Check the dashboard for alert lights. Look out for these indicators:
| Sign | Description |
|---|---|
| Dimming Lights | Weak battery output. |
| Slow Crank | Engine struggles to start. |
| Dashboard Warnings | Alert icons or unusual signals. |
Selecting The Right Charger For Your Motorcycle
Keeping your motorcycle ready for the road means ensuring its battery is fully charged. A dependable charger is crucial to maintain battery health and guarantee a smooth start every time. To make the right choice, understand charger types and key purchase considerations.
Types Of Motorcycle Battery Chargers
- Trickle Chargers: Offer a slow, steady charge, ideal for maintenance during off-season.
- Float Chargers: Monitor and maintain your battery at optimal levels without overcharging.
- Smart Chargers: Adjust the charge rate based on battery condition for efficient charging.
Factors To Consider When Buying A Charger
Not all chargers suit your motorcycle’s battery. Your choice should depend on several crucial factors. Here’s what to look for:
| Battery Type | Ensure the charger is compatible with your battery, whether it’s lead-acid or lithium-based. |
|---|---|
| Charging Power | Opt for a higher amperage for fast charging, or a lower one for maintenance. |
| Portability | Smaller sizes make for easy storage and on-the-go use. |
| Durability | Look for sturdy construction to withstand garage conditions and weather. |
| Connectivity | Automated features like detachable leads and quick connectors are a plus. |
| Safety Features | Short-circuit protection and spark-proof clamps are vital for safety. |
Pre-charge Preparation Steps
Ensuring your motorcycle battery is properly charged is crucial for a smooth ride. Before connecting your charger, taking the right steps can save time and prevent mishaps. The following pre-charge preparation procedures will guide you through the safe and effective charging process.
Safety Measures Before Charging
Personal safety comes first while handling a motorcycle battery charger. Here’s how to get started:
- Wear protective gear: Gloves and safety glasses are a must.
- Read the manual: Familiarize yourself with the charger’s instructions.
- Inspect the battery: Check for cracks or leaks. Do not charge if damaged.
- Confirm battery type: Ensure it matches the charger’s specifications.
- Unplug the charger: It should be off before connecting to the battery.
- Avoid flames and sparks: Batteries emit flammable gases.
Setting Up The Work Area
Create a safe and conducive environment with these steps:
- Choose a well-ventilated space: It helps disperse battery gases.
- Organize your tools: Have everything you need within reach.
- Clear the area: Remove any materials that can cause short circuits.
- Stable surface: Place the battery on a flat and secure spot.
- Check connections: Ensure the charger’s cables don’t have damage.
- Keep the charger dry: Prevent electric shocks and charger damage.
Follow these pre-charge preparation steps carefully to charge your battery safely and effectively, ensuring your motorcycle is ready for its next adventure.

Credit: www.wikihow.com
The Basics Of Battery Charging
Kickstarting your motorcycle journey begins with a fully charged battery. Just like fueling up, charging your battery correctly keeps your bike ready for any adventure. Let’s get down to the essentials.
How A Motorcycle Battery Charger Works
A motorcycle battery charger helps maintain your bike’s power source. It carefully adds energy back into the battery, ensuring it’s ready for your next ride. Understanding this tool’s function is step one to road-ready prep.
Features of a Charger:
- Voltage Regulation: It never overcharges the battery.
- Safety Mechanisms: It protects against short circuits.
- Indicator Lights: These show charging progress.
Connectivity: Chargers connect directly to battery terminals.
Automatic Shut-off: High-quality chargers stop when the battery is full.
The Charging Process Explained
Charging a motorcycle battery is a simple, yet critical process. Each phase ensures your battery gets the perfect energy boost with no damage.
- Inspect the Battery: Check for damage or leaks.
- Prep for Charge: Clean terminals and make sure they are dry.
- Set the Charger: Choose the right setting for your battery type.
- Connect Charger: Attach the positive and negative cables correctly.
- Begin Charging: Turn on the charger and monitor the progress.
- Complete Charging: Once done, the charger turns off or indicates completion.
Attention Points:
| Phase | Details |
|---|---|
| Inspection | Ensure safety before charging. |
| Connection | Red to positive, black to negative. |
| Monitoring | Observe the charging progress. |
Following this process revitalizes your motorcycle’s battery. Charge smart to keep your adventures endless!
Step-by-step Guide To Charging Your Battery
Charging a motorcycle battery doesn’t have to be complicated. With the right tools and steps, you can ensure your motorcycle is always ready to ride. This simple guide will walk you through the process, so you can handle the charging like a pro. Keep your bike’s power source in top shape by following these essential steps:
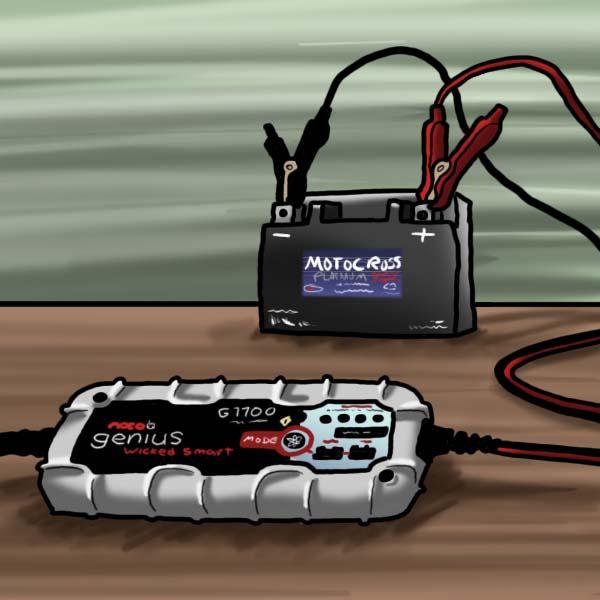
Connecting The Charger To The Battery
- Locate your motorcycle battery. Usually, it’s under the seat or behind a panel.
- Gather a suitable charger. Make sure it matches your battery type and voltage requirements.
- Prepare the battery. If necessary, remove the battery from the motorcycle.
- Identify battery terminals. Look for the ‘+’ and ‘-‘ signs for positive and negative.
- Connect the charger. Attach the red clip to the ‘+’ terminal and the black clip to the ‘-‘.
- Plug in the charger. Only do this after the clips are securely connected.
- Set the charger. If it has settings, select the right mode for your battery.
Monitoring The Charging Process
- Check the display. Your charger should show the charging status.
- Look for indicator lights. Green usually means ‘charged’ and red means ‘charging’.
- Ensure proper ventilation. Batteries can emit gases, so charge in a well-ventilated area.
- Avoid overcharging. This can shorten your battery’s life. Use a charger with an auto-off feature or a timer.
- Regularly inspect. Periodically check the battery to make sure it’s charging correctly.
- Test the battery. Once charged, use a voltmeter to ensure it holds the correct charge.
- Disconnect safely. Unplug the charger first, then remove the black clip, followed by the red.
- Re-install the battery. If you removed it, secure it back in its place properly.
Remember to always consult your motorcycle and battery manuals for specific instructions and safety information. Happy charging!
Optimizing The Charge Cycle
Correct charging methods extend battery life. Let’s dive into how you can maintain your motorcycle battery with effective charging techniques.
Maintaining Optimal Charge Levels
Getting the most from a motorcycle battery starts with maintaining optimal charge levels. A fully charged battery ensures peak performance. Use a voltmeter to check charge levels before you ride.
- Charge the battery if it falls below 12.6 volts.
- Charge in a well-ventilated area to avoid gas buildup.
- Follow your charger’s guidelines for the correct amperage.
Keep charge levels between 75% to 100%. It will help in preventing sulfate buildup.
Trickle Charging For Longer Battery Life
Trickle charging maintains battery power without overcharging. It’s ideal for long-term storage or maintaining infrequently used batteries. Connect your charger to the battery using the correct settings.
| Step | Action |
|---|---|
| 1 | Connect trickle charger clips to the battery terminals. |
| 2 | Plug in the charger after connections are secure. |
| 3 | Set to lowest charging rate to start. |
Monitor the battery during trickle charging. Opt for a smart charger to auto-adjust charge levels.
Troubleshooting Common Charging Issues
Charging your motorcycle battery should be simple. But sometimes, things don’t go as planned. Let’s solve some typical charging puzzles.
Dealing With A Non-responsive Battery
Is your motorcycle battery ignoring your charger? Don’t worry! Start with these steps:
- Check Connections: Ensure cables connect tight and clean.
- Examine the Charger: Use a different charger to test if yours might be faulty.
- Battery Health: Old or damaged batteries might need replacing.
If your battery still won’t charge, a deeper issue might be at hand. Inspecting the battery voltage with a multimeter can reveal deeper insights. A reading below 12.6 volts signifies an uncharged state, while under 10 volts often indicates a dead battery.
When To Seek Professional Help
Some electrical problems are tricky. Knowing when to call for help can save you time and frustration. Look out for these signs:
- Evidence of Overheating: Any smell or signs of burning mean stop immediately and get expert advice.
- No Voltage Change: If the battery voltage stays the same during charging, it might be time for an expert’s touch.
- Continual Non-responsiveness: If troubleshooting hasn’t worked, a mechanic can offer solutions.
Relying on a professional is smart when your personal fixes aren’t solving the problem. They can diagnose, repair, or suggest a new battery if needed.
Also Read: Is electric motorcycle a right choice?
Maintaining Your Charger For Longevity
Maintaining Your Charger for Longevity is key to ensuring your motorcycle battery remains in top condition. Just like the motorcycle itself, the charger needs regular attention. Proper care can greatly extend the life of your charger. It prevents unexpected failures and keeps your rides uninterrupted. Let’s explore ways to store and maintain your charger effectively.
Proper Storage And Handling
Storing your motorcycle battery charger correctly is crucial for its performance.
- Keep it dry: Store in a moisture-free environment.
- Avoid extreme temperatures: Place it in a location with stable, moderate temperature.
- Prevent drops: Handle with care to avoid damage from falls.
- Unplug when not in use: This saves power and reduces wear.
Routine Inspection And Maintenance Of Your Charger
Regular checks keep your charger in optimal condition. Follow these simple steps:
- Inspect cords: Look for fray or wear and replace if needed.
- Clean regularly: Wipe with a dry cloth to remove dust and debris.
- Check connections: Ensure all plugs and sockets are secure.
- Review the manual: Familiarize yourself with specific maintenance advice for your model.
- Test performance: Charge a battery occasionally to check functionality.
Credit: www.batterystuff.com
FAQ
How Do I Charge A Motorcycle Battery?
To charge a motorcycle battery, first ensure the charger is compatible. Connect the charger’s red clip to the battery’s positive terminal and the black clip to the negative terminal. Plug in the charger and turn it on, monitoring until fully charged.
How Long To Charge Motorcycle Battery?
Charging time depends on battery size and charger output. Generally, a motorcycle battery takes 4-6 hours to charge with a standard charger. A maintainer can take longer but provides a slower, consistent charge.
Should I Remove Battery For Charging?
It’s not always necessary to remove the battery for charging, but it’s recommended for safety. Removing the battery can prevent potential damage to the motorcycle’s electrical system and allows for inspection of the battery.
Can I Use A Car Charger On My Motorcycle Battery?
Use a motorcycle-specific charger for safety and battery longevity. Car chargers typically have a higher amperage rating which can overwhelm a motorcycle battery, potentially causing damage.
Bottom Line
Charging your motorcycle battery doesn’t need to be daunting. With the right charger and these step-by-step directions, maintenance is straightforward. Keep your rides smooth and your battery’s lifespan extended. Embrace these tips, and your motorcycle will thank you with peak performance and lasting reliability.


Leave a Reply